
Complete Owner's Manual (EP9 MDB)Updated 5 minutes ago
The complete EP9 MDB Owner’s Manual on one page. Scroll through it, or jump to a section below.
Contents
1 Safety
1.1 Read This First
1.2 General Firearm Safety Rules
1.3 Lead Exposure Warning
2 Operation
2.1 Unloading & Clearing
2.2 Loading & Firing
2.3 Malfunctions & Failure to Fire
3 Maintenance
3.1 Field Stripping
3.2 Cleaning & Lubrication
3.3 Reassembly
3.4 MDB Assembly Service
3.5 Muzzle Devices & Handguard
4 Reference
4.1 Parts Identification
4.2 Limited Warranty & Service
1 Safety
1.1 Read This First
We want you to enjoy shooting your new Extar EP series pistol, but we want you to enjoy it safely. You may be an experienced safe shooter already familiar with the procedures in this instruction manual, or you may never have handled a firearm before. Either way we urge you to read this entire instruction manual carefully. You must follow the safety instructions for your safety and the safety of others.
Warning!
If this firearm is carelessly or improperly handled, unintentional discharge could result and could cause injury, death or damage to property. However, your safety and the safety of others depend on your compliance with this advice, and your adoption, development and constant employment of safe practices. If unfamiliar with firearms, seek competent advice through safe handling courses run by your local gun range or an approved NRA instructor, or similar qualified organization.
Notice!
This instruction manual should always accompany this firearm whenever this firearm is loaned or transferred to another individual. The manufacturer shall not be responsible for injury, death or damage to property resulting from either intentional or accidental discharge of this firearm, or from its function when misused for purposes or subjected to treatment for which it was not designed.
Please read through all of the procedures listed in this manual. If any part of this manual is unclear to you, please contact us before attempting the procedure.
THIS IS NOT A SAFETY MANUAL
If you need assistance with the safe handling of this, or any firearm, please contact a certified firearm’s instructor or school.
Open 1.1 on its own page · Back to contents
1.2 General Firearm Safety Rules
1.2.1 Always handle your firearm as if it were loaded.
1.2.2 Never point your firearm at anything you are not willing to destroy.
1.2.3 Always make sure your firearm is not loaded and bolt is locked open before laying it down or handing it to someone else.
1.2.4 Never leave a loaded firearm unattended.
1.2.5 Always be sure barrel, bore, chamber and action are clear of obstruction.
1.2.6 Never drink alcoholic beverages or take drugs before or during shooting.
1.2.7 Always wear eye and ear protection when shooting.
1.2.8 Always keep the firearm safety selector on safe when it is loaded, until ready to shoot.
1.2.9 Never attempt to fire if the bore is obstructed.
1.2.10 Never indulge in “horseplay” when operating firearms.
1.2.11 Always be sure of your backstop and that is it adequate to contain projectiles before beginning target practice so that you do not hit anything outside the range.
1.2.12 Always put a knowledgeable and responsible person in charge to maintain safety and control when a group is firing on a range. Obey commands so that discipline is maintained to reduce the likelihood of accidents.
1.2.13 Always carry your firearm empty with the bolt locked open while on the range until preparing to fire. Keep it pointed towards the backstop or in a safe direction when loading, firing and unloading.
1.2.14 Always be sure barrel bore, chamber and action are clean and clear of obstructions. Clean a wet or fouled firearm as soon as possible so that it will continue to function safely and properly.
1.2.15 Always use only clean, dry, original high-quality commercial ammunition in good condition, and of designated caliber of your firearm. DO NOT USE ALUMINUM CASE AMMUNITION OR RE-MANUFACTURED AMMUNITION. (RELOADS)
1.2.16 Do not attempt to use any type of drum fed magazine.
1.2.17 Do not use Winchester Forged ammunition.
1.2.18 Forcing damaged ammunition into the chamber could cause damage to the weapon and could result in injury, death or damage to property.
1.2.19 Always seek a doctor’s advice if you are taking medication, to be sure you are fit to shoot and handle your firearm safely.
1.2.20 Always wear ear protection and advise others in close proximity to do so as well. Discharging firearms without hearing protection can cause hearing loss over time.
1.2.21 Always wear eye protection and advise others in close proximity to do so as well. Flying particles could damage eyes and cause blindness but wearing protective equipment will greatly reduce your risk of injury.
1.2.22 Always keep clear and keep others clear of the ejection port. Spent cartridges are ejected with enough force to cause injury and the ejection port must be unobstructed by your hand to insure safe ejection. Never place fingers in the ejection port, they could be burned or injured by the bolt moving forward.
1.2.23 Never put your finger in the trigger guard until you are aiming at a target and ready to shoot.
1.2.24 Always be absolutely sure of your target and the area behind it before you squeeze the trigger. A projectile can travel up to three miles; if in doubt, don’t shoot.
1.2.25 Never shoot at a hard surface such as a rock, or a liquid surface such as water. A projectile may ricochet and travel in any direction causing injury, death or damage to property.
1.2.26 Never discharge a firearm near flammable substances since flame and sparks are expelled from a firearm.
1.2.27 Keep this firearm out of the reach of children, unauthorized individuals and others unfamiliar with the safe handling practices of firearms.
Failure to follow these rules can result in damage to property, injury or death. Always follow these instructions and carefully read and refer to this manual before loading your firearm.
Open 1.2 on its own page · Back to contents
1.3 Lead Exposure Warning
Discharging of firearms in poorly ventilated areas and handling of ammunition may cause exposure to lead and or lead compounds. Exposure may cause cancer, birth defects and other reproductive harm. Have adequate ventilation at all times, especially in confined areas. Wash hands thoroughly after shooting, handling ammunition, or cleaning the firearm. Do not eat or smoke during these activities.
Open 1.3 on its own page · Back to contents
2 Operation
2.1 Unloading & Clearing
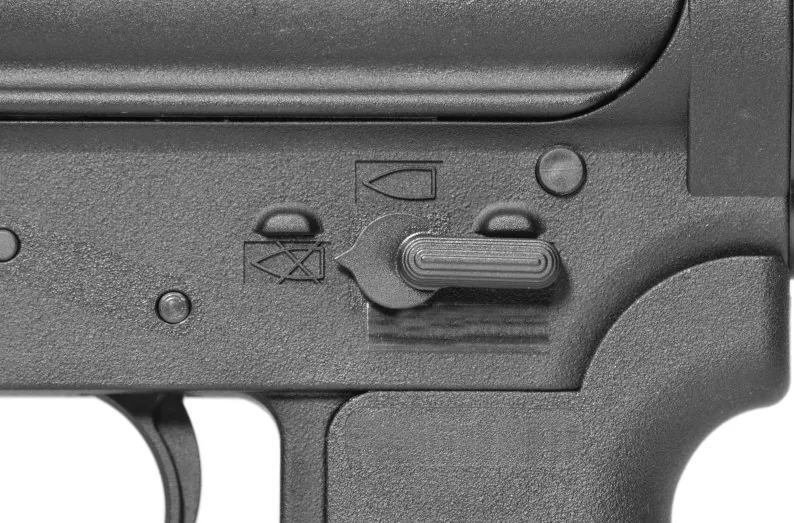 Figure 1
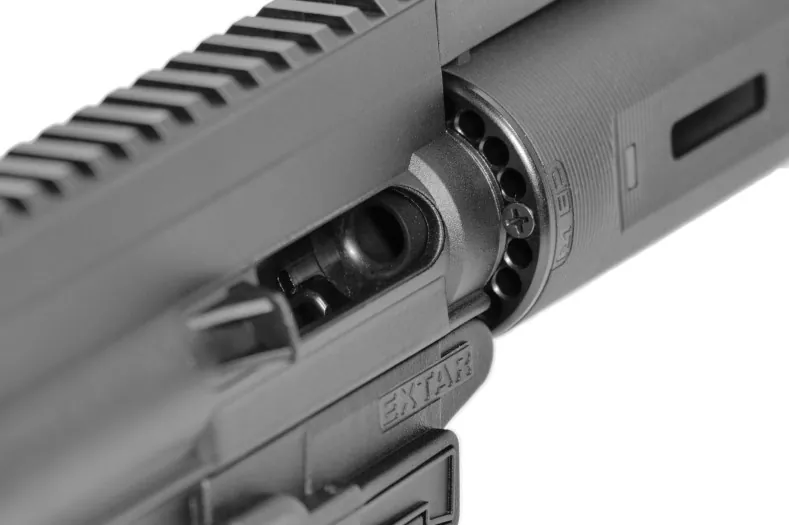 Figure 2
2.1.1 Keep your pistol pointed in a safe direction for the duration of the procedure.
2.1.2 Place your safety selector on “SAFE”. You cannot select the “SAFE” position unless the hammer is cocked. (fig 1)
2.1.3 Depress the magazine catch button and remove the magazine.
2.1.4 Eject the chambered cartridge by retracting the charging handle until it stops. Let the ejected cartridge fall to the ground.
2.1.5 While holding the charging handle to the rear, inspect the chamber and receiver to ensure you have removed any cartridges from the action and barrel chamber. (fig 2)
2.1.6 Release charging handle once you have verified the chamber to be clear and no cartridges are in the pistol. Your pistol is now unloaded and clear. It may now be loaded or prepped for transportation or storage.
Open 2.1 on its own page · Back to contents
2.2 Loading & Firing
Begin with a pistol that has been verified to be unloaded using the preceding directions. Make sure the selector is on safe.
2.2.1 Keep your pistol pointed in a safe direction for the duration of the procedure.
2.2.2 Load your magazine with proper ammunition. Place cartridge in front of feed lips, press down until it is below feed lips and then slide fully to the rear.
2.2.3 To insert your magazine, press the magazine upwards into the magazine well until it locks in place. Pull the magazine down to verify that it is locked in place. IMPORTANT NOTE: Forcing a fully loaded magazine to seat on a closed bolt can be difficult and possibly cause damage to your magazine or pistol that could make it unusable. Magazines should either be loaded one less than full, or only inserted with the bolt locked to the rear.
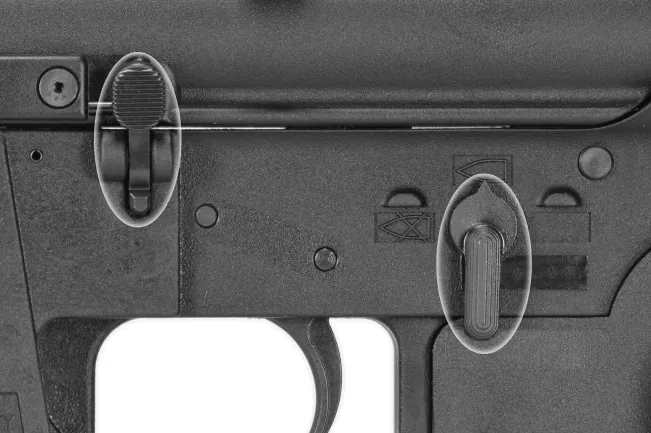 Figure 3
2.2.4 Retract the charging handle fully to the rear. Release the charging handle. Do not “ride” or attempt to control the charging handle while chambering a cartridge, as this can cause the pistol to misfeed. Your firearm is now loaded.
2.2.5 Place the selector on “FIRE” (fig 3). Your pistol is now ready to shoot.
2.2.6 Squeeze the trigger until the hammer is released.
2.2.7 Once the magazine is empty, the LRBHO (Last round bolt hold open) will lock the bolt back, leaving the bolt in the open position. Depress the bolt catch (fig 3) to send the bolt forward, this will chamber another round if you have a loaded magazine in the pistol.
Open 2.2 on its own page · Back to contents
2.3 Malfunctions & Failure to Fire
2.3.1 If an audible “pop” or reduced recoil is experienced during firing, immediately CEASE FIRE, remove the magazine, lock the bolt to the rear and place the selector lever to the safe position. Visually inspect and/or insert a cleaning rod into the bore to ensure that a projectile is not lodged in the bore.
2.3.2 Failure to fire: always hold the firearm, keeping it pointed in a safe direction and wait 30 seconds when it fails to fire. If a hang fire (slow ignition) has occurred the round should fire within 30 seconds. If the round does not fire, open the breech, eject the round and examine the primer. If the firing pin indent is slight, off center or non-existent, have the firearm examined by a competent gunsmith before firing again. If firing pin indent appears normal in comparison with previously fired cases, you can assume faulty ammunition. Properly discard and resume firing. Note: it is normal for a light firing pin indent to appear on the primer of cartridges which have been fed into the chamber of the pistol but not fired.
2.3.3 Never use your pistol if it fails to function properly and never attempt to force a jammed action into battery.
2.3.4 Never alter any of your pistol’s components, as the level of safety could be reduced.
2.3.5 If your pistol is in need of repair or replacement parts, please contact Extar for instructions and prior approval before shipping a firearm to our facility.
Open 2.3 on its own page · Back to contents
3 Maintenance
3.1 Field Stripping
Regular cleaning and maintenance will ensure proper function and long life of your firearm. Before disassembling your pistol, unload and make absolutely certain that your pistol has been cleared, as described in the unloading instructions.
3.1.1 Verify your pistol is unloaded/clear and return the bolt into battery.
3.1.2 Partially push the rear take down pin from the left side so it is not captured by the detent that retains it in the receiver in the closed position. Do not attempt to drive it out with a punch. A bullet tip or other tool that will move it enough to grasp the head on the opposite side is proper procedure. (fig 4)
3.1.3 Pull the rear take down pin the rest of the way to the right side of the lower receiver until it engages the detent that holds the pin in the open position. (fig 5)
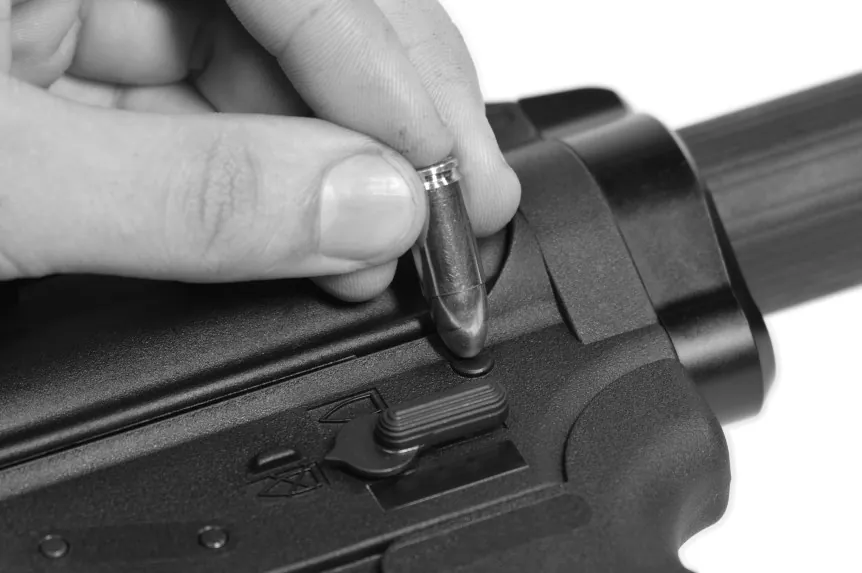 Figure 4
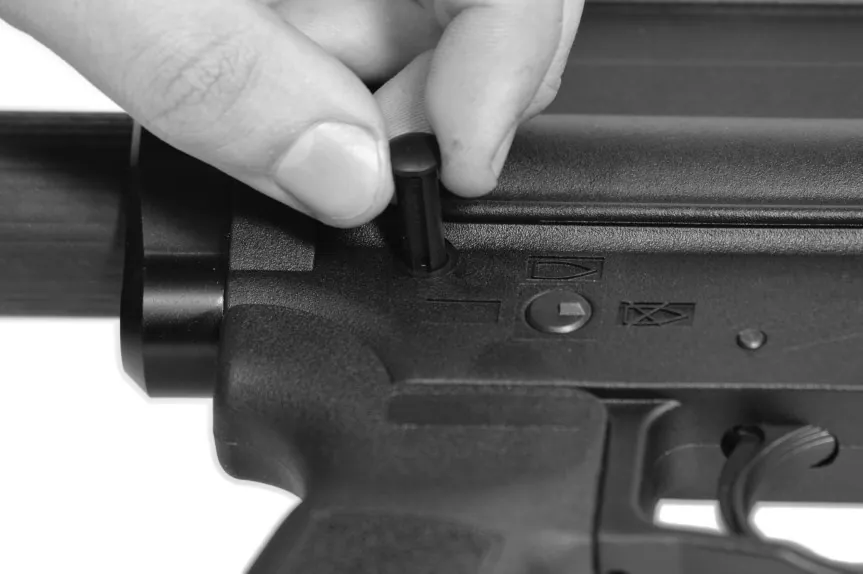 Figure 5
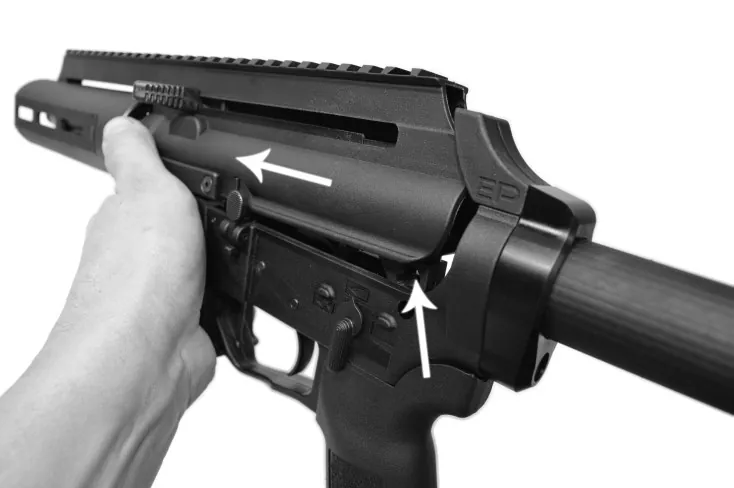 Figure 6
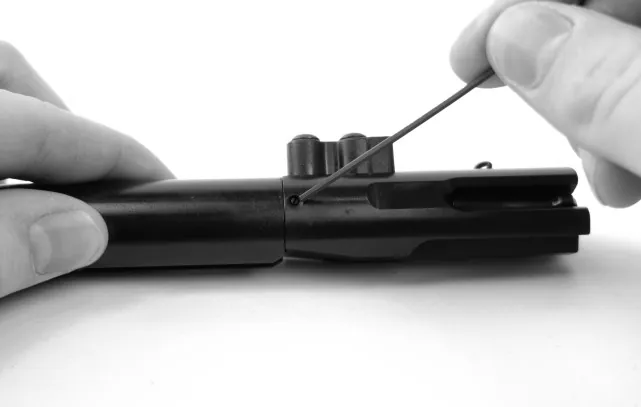 Figure 7
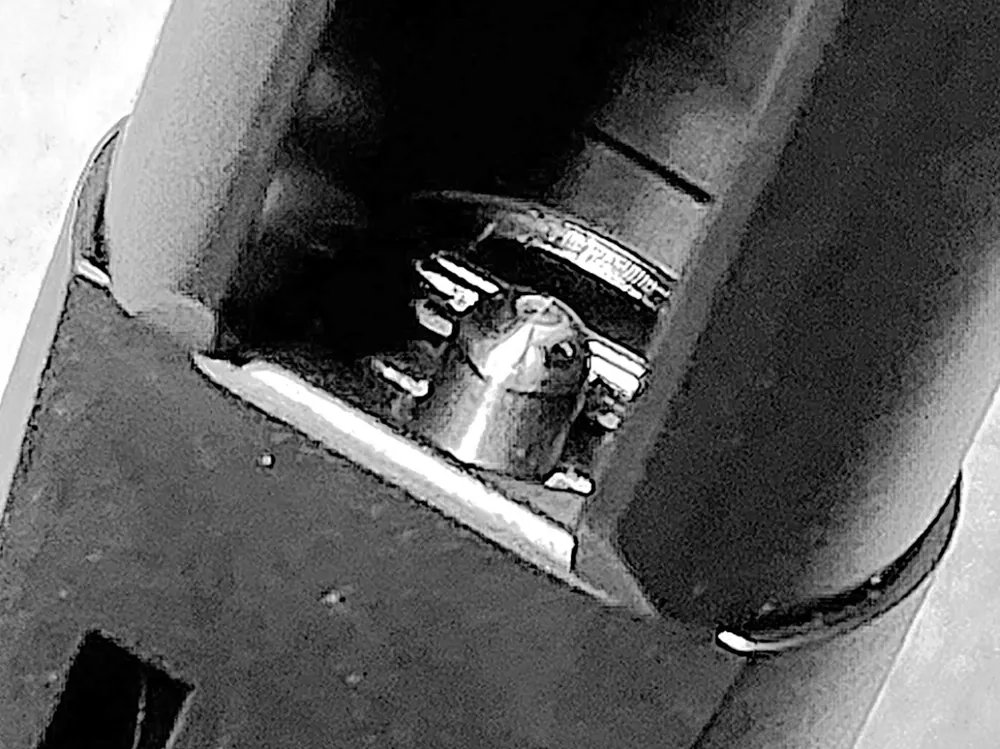 Figure 8
3.1.4 Grasp the front of the magazine well with a thumb up on the back of the hand guard retainer as shown in the illustration. (fig 6) Push the upper assembly forward with thumb until it lifts up in the back to a loose position and simultaneously disengages from the front retaining hook.
3.1.5 The upper and lower receiver groups are now separated; set the lower receiver group aside.
3.1.6 Move the charging handle a couple of inches to rear and remove the bolt assembly. It will simply pull straight out with no further action required.
3.1.7 Remove the firing pin retainer from the left side of the bolt carrier group. You may use a small tool to push out the firing pin retainer. (fig 7) To further aid disassembly you may need to slightly depress the firing pin to relieve tension from the firing pin spring. Before removing the retainer note its position relative to the firing pin head. It MUST be reinstalled positioned the same way. (fig 8)
3.1.8 Tilt bolt face up and remove firing pin from the bolt.
3.1.9 Remove the extractor by pulling the retaining pin up and out of the bolt while applying slight pressure onto the lateral face of the extractor. (fig 9) Please note: When reinserting the extractor retaining pin, you must insert it from the top, not the bottom. The loop must be on the top. (fig 9)
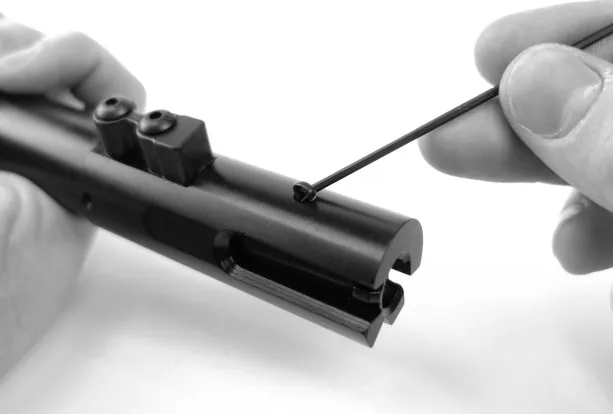 Figure 9
3.1.10 Your pistol is now disassembled to the point necessary for normal required cleaning and maintenance. Do not attempt disassembly of your bolt any further than herein described.
Open 3.1 on its own page · Back to contents
3.2 Cleaning & Lubrication
3.2.1 Your EP Series pistol has been designed implementing advanced materials that eliminate the need for oil lubrication. Your EP series pistol will have optimal performance and best longevity if simply kept clean and dry. Cleaning is achieved with traditional products. The EP9 components are impervious to even the most powerful solvents or hydrocarbons. Oils can be used for post cleaning if one simply insists, as none will attack the material, but they will not enhance function or decrease wear, and they tend to retain and circulate contamination that results in just the opposite. If anything, dry lubricants such as a light fog of silicone spray or any of the PTFE based dry lubricant sprays are preferable over oil, but again, best longevity will be achieved without their use.
Open 3.2 on its own page · Back to contents
3.3 Reassembly
Figure 8 · shown again from Field Stripping
Figure 9 · shown again from Field Stripping
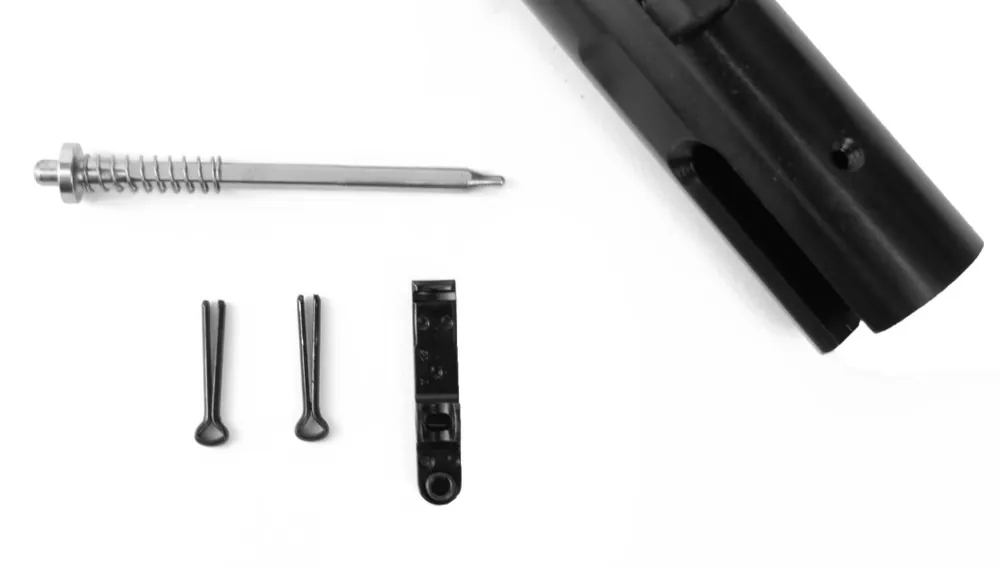 Figure 10
3.3.1 Assembly is the reverse order of the disassembly steps. IMPORTANT: The firing pin spring, if it has been removed, must be assembled back onto the firing pin as illustrated with the spring all the way up over the retaining shoulder. (fig 10) Failure to do so can result in spring or firing pin breakage and failure to function. Upon reinserting the bolt into the upper receiver make sure that the last round bolt hold open actuator is positioned out of the path of the bolt.
Open 3.3 on its own page · Back to contents
3.4 MDB Assembly Service
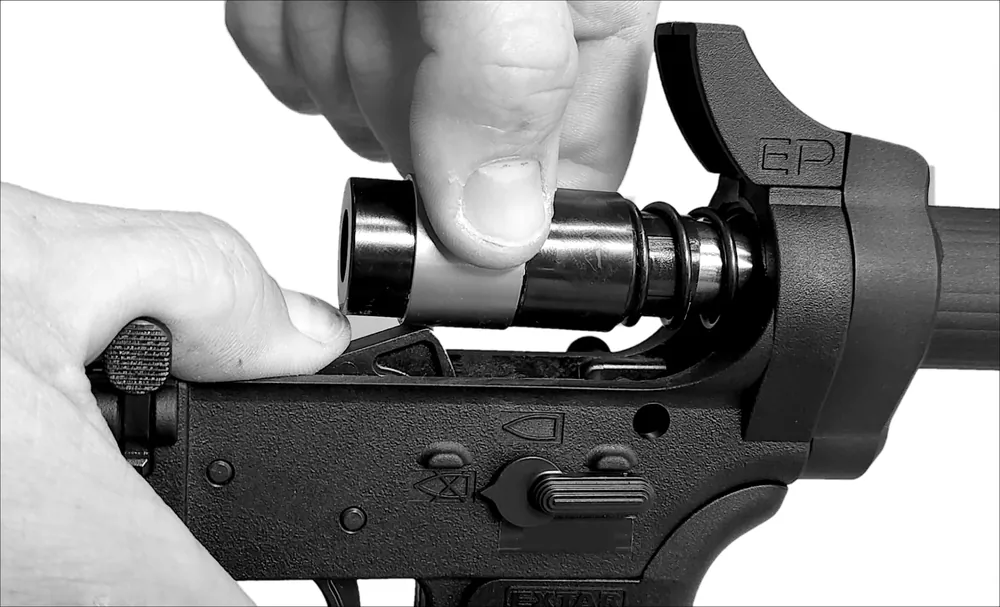 Figure 11
Follow steps 1-5 from the Disassembly Instructions for Normal Cleaning and Maintenance. The MDB assembly can be removed by tilting the lower receiver forward while simultaneously holding the hammer depressed past the cocked position. This will allow the MDB assembly to be easily removed from the receiver extension. (fig 11) Cleaning and lubrication is recommended every 2000 rounds. Please watch the instructional video detailing this procedure on our website. extarusa.com/mdbservice
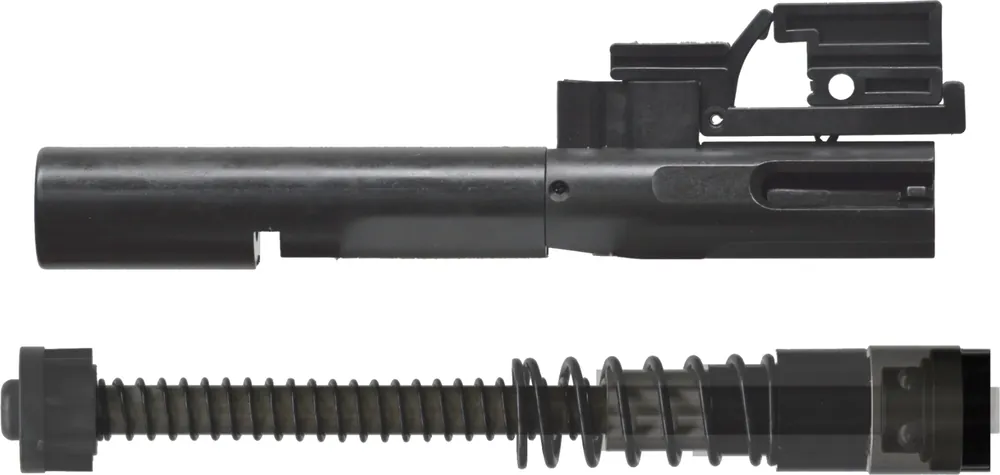 Figure 15
Open 3.4 on its own page · Back to contents
3.5 Muzzle Devices & Handguard
WARNING: Always confirm that any muzzle device is appropriate for use with the designated caliber of the firearm. If you are not sure or do not have the capability to physically confirm this, consult a qualified gunsmith.
The Extar EP Series pistol is uniquely designed to accommodate easy and efficient muzzle device work in an uncommonly sensible manner. Do not attempt to use “upper vise jaws” or any similar devices designed for other firearms. Simple and common hand tools are all that is required and all that should be used to prevent damage to your pistol.
3.5.1 Remove the factory muzzle device first. It implements a washer and o-ring for required retention and can be removed by hand with a firm grip. Any device that does not require rotational orientation (timing) should be mounted using the factory washer and o-ring as tightly as one can accomplish by hand. Torquing is not necessary with these types of devices, and the washer and o-ring prevent any loosening during use.
3.5.2 Remove the handguard by removing the two retaining screws on the backside of the hand guard retainer, using a Phillips head screwdriver. (fig 12)
3.5.3 After both screws have been completely removed, the hand guard may now be pulled firmly forward to release it from the retaining slot at the front of the upper rail. (fig 13)
3.5.4 For muzzle devices that require orientation or torquing and are small enough to pass through the handguard, standard open-end wrenches should be used to perform required work. (fig 14) For additional stability the wrench flats on the barrel can be covered with heavy protective paper and lightly clamped in an appropriate area of a vise, but this is usually not necessary and wrenches are the preferred method to avoid damage. If a vise is used on the flats, tighten only enough to hold against rotation, as a powerful vise could easily deform the barrel bore.
3.5.5 Assemble in reverse order. Make sure to only hand tighten the handguard back on and do not use power tools.
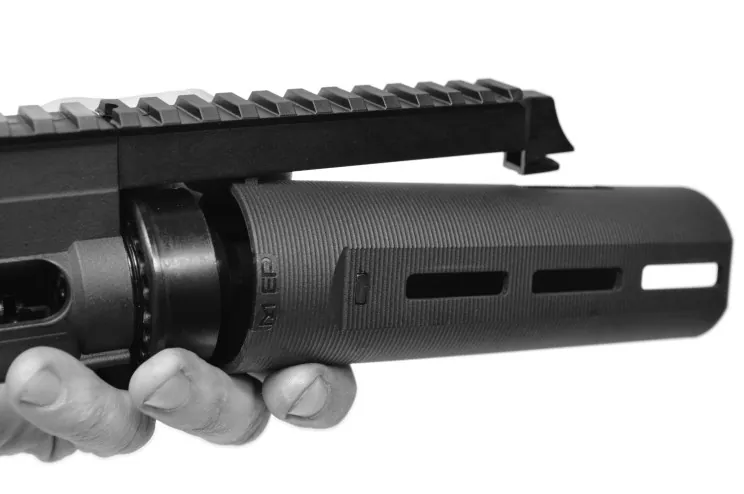 Figure 12
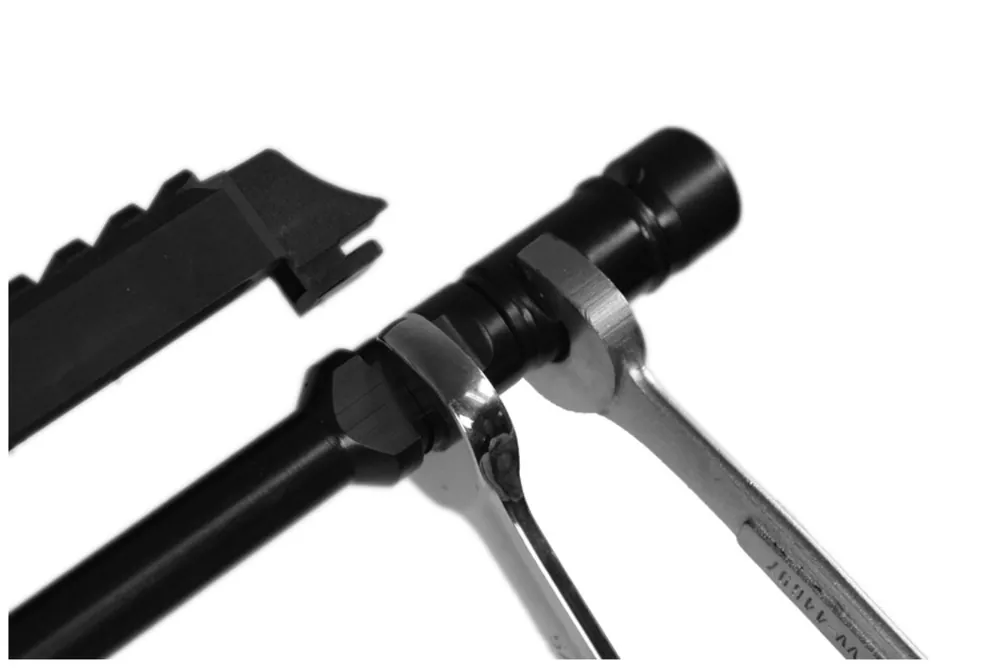 Figure 13
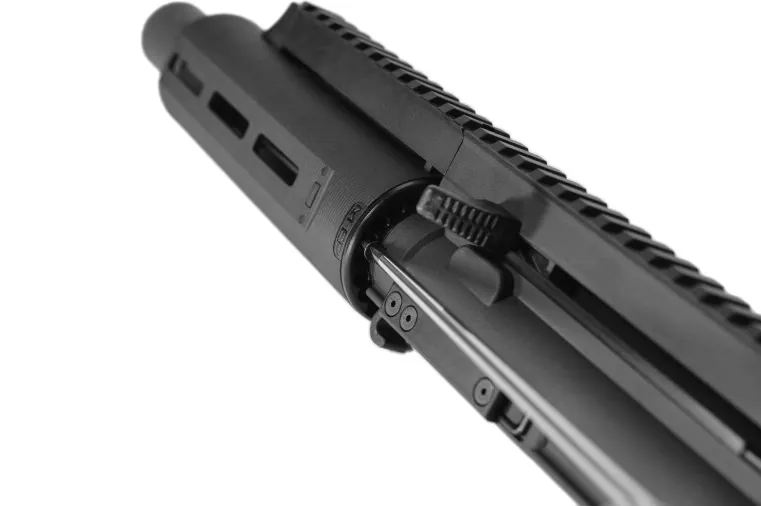 Figure 14
Open 3.5 on its own page · Back to contents
4 Reference
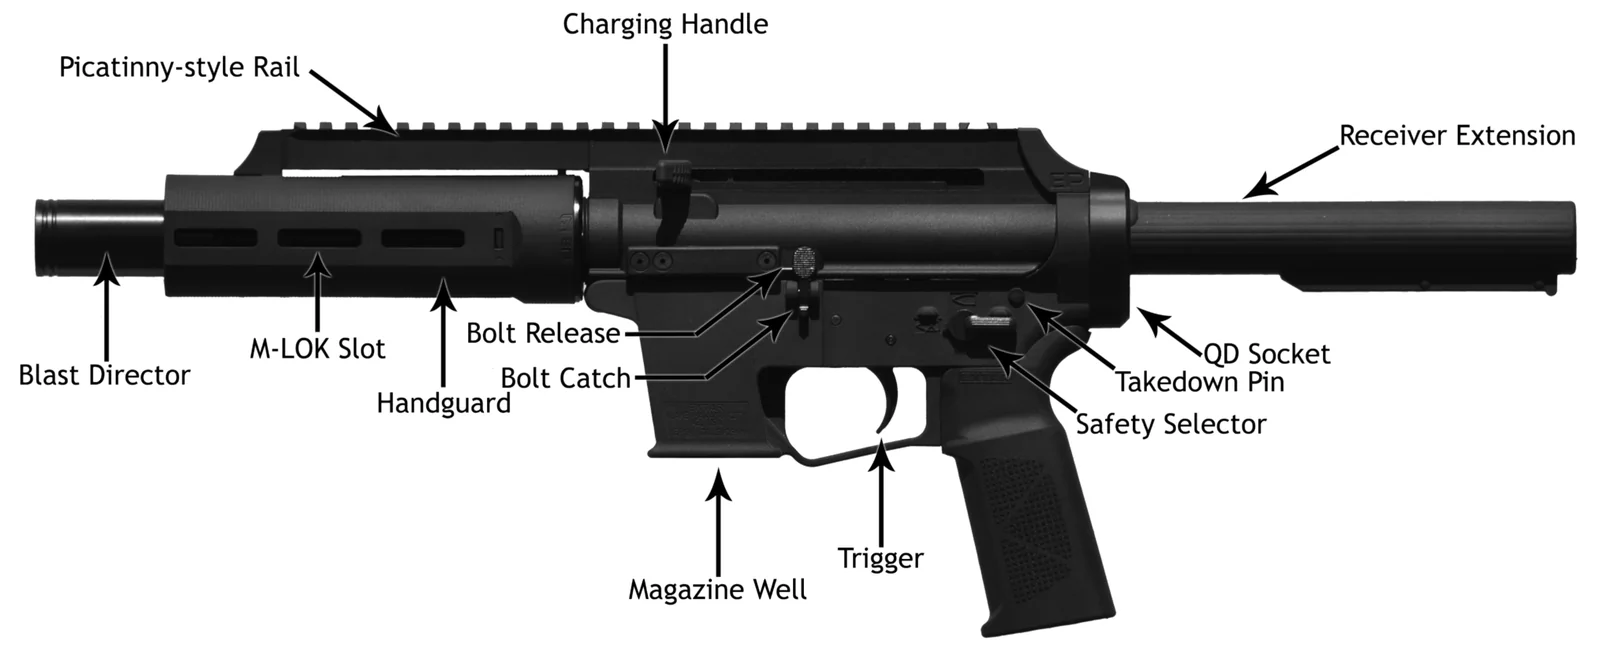
4.1 Parts Identification
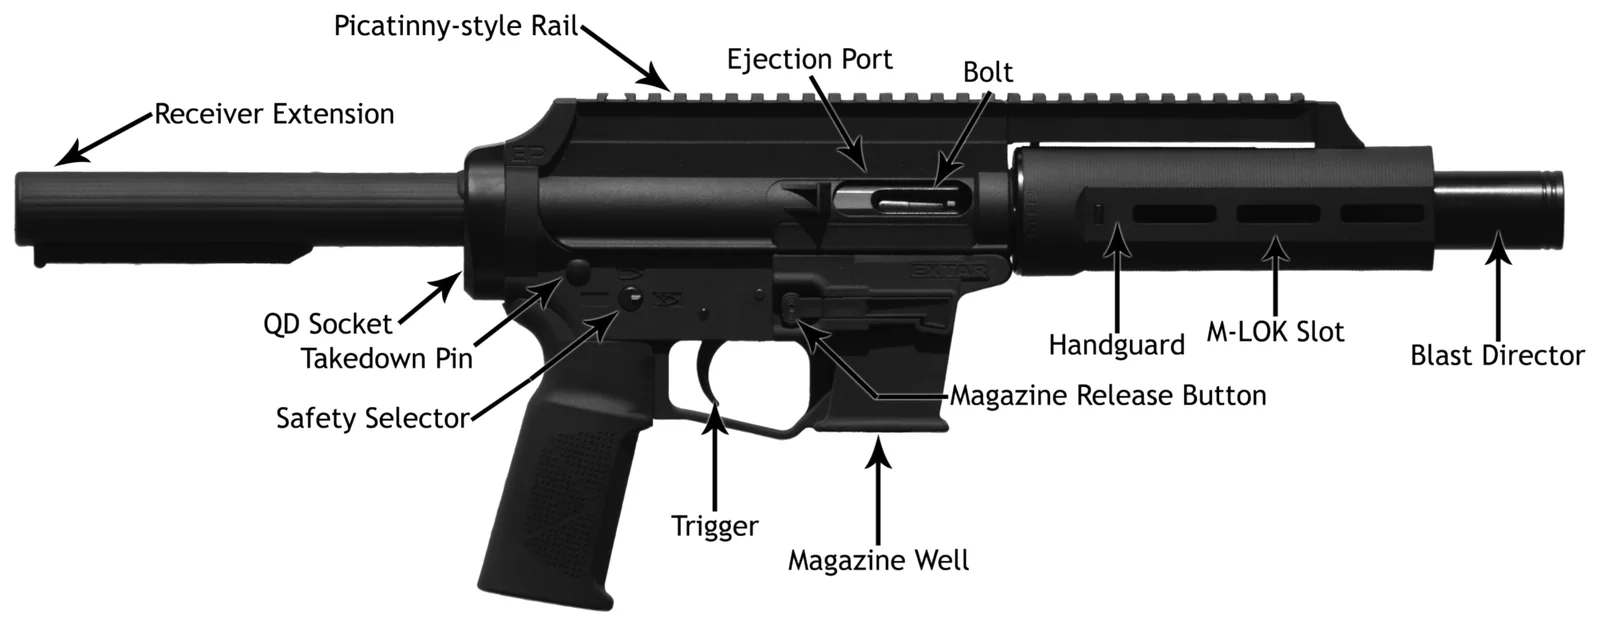
Open 4.1 on its own page · Back to contents
4.2 Limited Warranty & Service
Extar LLC products are warranted to be free from defects in materials and workmanship for one year and ten days from the date of purchase. The warranty card included with this pistol should be completely filled out and sent to EXTAR LLC to activate the warranty, or you may register your firearm on our website. Any such defect of which EXTAR LLC is given written notice, as provided below, within warranty period by a customer will be remedied by EXTAR LLC. This limited warranty is granted by EXTAR LLC. To initiate warranty service, you must first contact EXTAR LLC at [email protected] and get a “Warranty Return Authorization” number. All warranty claims should state the model and serial number of the gun, a description of the difficulty experienced, and the date of purchase. It is recommended that the owner insure shipment, since EXTAR LLC will not accept responsibility for loss or damage in transit. EXTAR LLC will pay transportation and insurance charges for return to owner if the claim is covered by warranty. After authorization has been granted, the firearm should be sent to:
Warranty Service Department
EXTAR LLC
1070 Metric Dr.
Lake Havasu City, AZ 86403
www.extarusa.com